


Tesla taillight assembly repair is a complex process influenced by wear & tear, weather, and auto maintenance. This guide offers a step-by-step approach for DIY enthusiasts, emphasizing safety, disassembly/reassembly techniques, and root cause identification. Key steps include locating the module, disconnecting power, removing damaged parts, installing new assemblies, testing functionality, resetting modules/connectors, and regular collision center visits for comprehensive car care, ensuring optimal performance and enhanced road safety.
Tesla taillight assembly repair is a crucial aspect of vehicle maintenance. This article delves into the common issues afflicting Tesla tail lights, shedding light on their causes. We offer a step-by-step guide for repairs, emphasizing the importance of resetting modules and connectors as a vital component of the process. By understanding these key steps, you’ll be equipped to address and prevent future taillight assembly problems, ensuring your Tesla’s safety and aesthetic appeal on the road.
- Understanding Tesla Taillight Assembly Issues and Their Causes
- Step-by-Step Guide to Repairing the Taillight Assembly
- Resetting Modules and Connectors: A Crucial Component of the Repair Process
Understanding Tesla Taillight Assembly Issues and Their Causes
Tesla taillight assembly issues can stem from various factors, making Tesla taillight assembly repair a complex task. Common problems include faulty connectors and damaged modules, often resulting from everyday wear and tear or external impacts like collisions. A collision repair might cause significant stress on the taillight components, leading to malfunctions that require expert intervention.
In addition, exposure to harsh weather conditions, such as extreme temperatures and moisture, can accelerate the degradation of these parts. Improper auto maintenance practices, like neglecting regular checks or using substandard replacement parts, can also contribute to the premature failure of Tesla taillight assemblies. Identifying the root cause is crucial for effective Tesla taillight assembly repair, ensuring not only functionality but also maintaining the vehicle’s safety features and overall aesthetic appeal.
Step-by-Step Guide to Repairing the Taillight Assembly
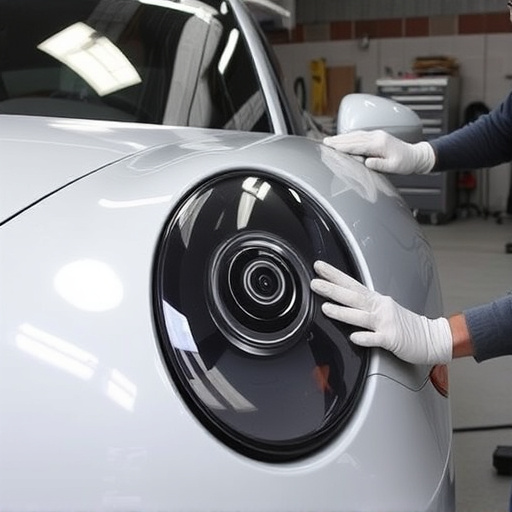
Repairing a Tesla taillight assembly can be done following this straightforward step-by-step guide. First, locate and access the taillight module, which is typically located behind the taillight housing. Next, disconnect the power source to ensure safety during the repair process. With the necessary tools at hand, carefully remove the damaged or faulty taillight assembly, taking note of any retaining clips or screws. Once the old assembly is removed, clean the area and inspect for any signs of damage to the fender or surrounding components.
Proceed to install the new taillight assembly, ensuring proper alignment with the vehicle’s frame. Reattach any clips or screws securely. After tightening, test the functionality by switching on the tail lights. If everything operates as expected, move on to resetting the module and connector. This involves resetting the power supply and checking for any error codes in the car’s system. Regular visits to a collision center or professional mechanic can help maintain optimal vehicle performance and safety regarding Tesla taillight assembly repair and other essential car maintenance tasks like dent repair.
Resetting Modules and Connectors: A Crucial Component of the Repair Process
Resetting modules and connectors is a vital part of the Tesla taillight assembly repair process. It ensures that all electronic components are functioning optimally after being disassembled due to damage, usually from a vehicle collision or dent removal. This step involves more than just plugging in new parts; it requires a systematic check and re-initialization of communication between various car systems, including the lighting control module and other sensors.
A qualified collision repair shop understands that this process is crucial for safe and effective taillight operation. They use specialized tools to perform a module and connector reset, ensuring that each component is correctly aligned and signaling properly. This meticulous attention to detail guarantees not just the visual appeal of a freshly repaired taillight assembly but also its reliability in adverse driving conditions, enhancing road safety for all drivers.
In conclusion, repairing a Tesla taillight assembly involves addressing potential issues rooted in module and connector functionality. By following a structured guide that includes resetting these components, you can effectively restore your vehicle’s lighting system to optimal performance. This DIY approach not only saves costs but also deepens your understanding of electric vehicle maintenance. For any complex steps, remember to refer to detailed tutorials or consult professional guidance for peace of mind. Tesla taillight assembly repair is a manageable task that contributes to maintaining the safety and aesthetics of your vehicle.